

Charging lithium cells using a bench power supply requires careful attention to the specifications of the cells and the capabilities of the power supply. Here’s a step-by-step guide, tailored for both beginners and experienced enthusiasts.
Caution: If you get this wrong the cell could catch fire or even explode. The best practice is to stick with the manufacturer’s original charger.
Step 1: Understand Your Lithium Cell Specifications
- Voltage: Determine the nominal and maximum charge voltage of the cell. For example, a typical lithium-ion cell has a nominal voltage of 3.7V and a maximum charge voltage of 4.2V. This information could be printed on the battery or you may need to find the datasheet.
- Capacity and Charge Rate: Know the capacity of your cell (in ampere-hours, Ah) and the recommended charge rate (usually expressed as a C-rate, like 1C). This will only be found in the datasheet.
Step 2: Set Up Your Bench Power Supply

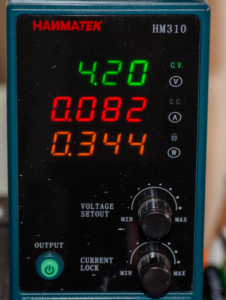
- Voltage Setting: Set the power supply to the maximum charge voltage of the cell. For a standard lithium-ion cell, this would be 4.2V. (Do not guess, check the datasheet)
- Current Limiting: Set the current limit to a safe value. For a 1C charge rate, set it to the same value as the battery’s capacity. For example, for a 2Ah cell, set it to 2A.
Taking that all into account and looking at the datasheet, I am going to do a “Standard Charge”. On my bench power supply I will set the max current to 1250mA and the Voltage to 4.2V. I then keep a careful eye on the current on the power supply and turn it off before it gets as low as 50mA.
Step 3: Connect the Cell
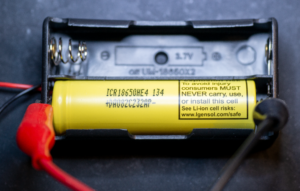
- Connect the cell to the power supply, ensuring correct polarity. Positive (+) on the cell goes to the positive output on the power supply, and negative (-) to the negative.
Step 4: Begin Charging
- Turn on the power supply. The cell will start charging. Monitor the voltage and current.
Step 5: Monitoring the Charge

Process
- Current Monitoring: Initially, the power supply should supply the set current limit (e.g., 2A). As the cell approaches full charge, the current will gradually decrease.
- Voltage Monitoring: The cell voltage should gradually increase to the set voltage limit (e.g., 4.2V) and not exceed it.
Step 6: End of Charge
- The charge is complete when the current drops to a predefined level, usually about 10% of the initial set current. For instance, if you started at 2A, stop charging when the current falls below 200mA. Having said that, my datasheet says the cutoff is 50mA. I will stop charging somewhere around 50-100mA to be on the safe side. Unfortunately my power supply does not show the voltage of the cell in real time. I connected a multimeter to the cell to keep an eye on things and make sure I didn’t go to close or over 4.2V.
Step 7: Disconnect the Cell
- Once charging is complete, turn off the power supply and disconnect the cell.
Safety Tips and Best Practices
- Never leave the charging process unattended.
- Use a power supply with a good reputation for stability and accuracy.
- Always charge in a safe area, away from flammable materials.
- If the cell becomes hot, swollen, or shows any sign of distress, immediately disconnect and safely dispose of it.
- You should use a dedicated lithium battery charger if possible for added safety features like overcharge protection.
Final Notes
This method is a basic way to charge lithium cells and does not include advanced features like balancing for multiple cells. For more complex setups or packs, a dedicated charger is recommended.
Remember, safety is paramount when working with lithium cells. If you’re ever in doubt, consult with a professional or use a dedicated charger designed for lithium batteries.
Formula for charge time estimation:
For instance, a 2.5Ah battery charged at 1250mA would take approximately 2 hours to charge. However, due to inefficiencies and the nature of the charging curve, it may take slightly longer.


Leave a Reply